
Part 3: Bovine Abdomen
Abby Brown
TOPOGRAPHY OF RUMINANT ABDOMINAL VISCERA IN SITU
OVERVIEW — While it is important to be able to understand the viscera on the post mortem exam table, it is more important to know the normal position during life. In surgery, most identification will be by palpation rather than by sight. We will attempt to mimic this procedure by palpating the viscera through small openings in the caudal abdominal wall. In addition, the “windows” cut into the diaphragm will allow visualization of much of the viscera. There will also be isolated viscera on a table for you to manipulate and study. In the demonstration activity, you will receive further reinforcement of the anatomy through an instructor led “tour” of fresh bovine viscera. The combination of these activities will allow you to learn the viscera and understand their placement within the abdominal cavity.
LOGISTICS – You will be assigned a specific time slot for the instructor led demonstration sessions. When you are not engaged in a demonstration you should go to the demonstration (prosection) specimens to palpate and view the abdominal structures and viscera. There will also be various dry museum specimens and isolated wet specimens to study and be familiar with (i.e., it is expected that there will be a lot of movement of students back and forth between demonstrations and specimens).
Table 5-2 Major structures to be palpated/seen on each side of the ruminant abdomen
|
LEFT side |
RIGHT side |
|
Ruminoreticulum* Spleen |
Entire liver, both kidneys Omasum and abomasum Small and large intestines |
*Note: The ruminoreticulum is so large that almost all other viscera are “pushed” to the right side. Even the left kidney is “pushed” to the right so that it hangs to the right of the dorsal sac near the midline.
palpation of Bovine abdominal viscera in situ
The following is a summary of the two-step process you will employ to begin to understand the normal placement and structure of the bovine abdominal viscera: STEP 1, Palpation and Visualization: Each person from your group should spend several minutes palpating and then yield to another group member. One person can palpate on each side simultaneously. As palpation occurs you should be discussing amongst yourselves your successes and struggles so that all will get the most out of the exercise. In so doing you will go in and out of the abdominal cavity several times. Nothing will prepare you better for abdominal surgery on a live animal than palpation opportunities such as this. STEP 2, The “Reveal”: Toward the end of lab (after all group members have done the palpation) you will incise the abdominal wall so that the contents can be dropped out of the cavity onto a table (i.e., you will be able to visualize the supporting attachment points of the viscera).
STEP 1, Palpation and Visualization:
- Be sure that the abdominal wall layers of the calf have been reflected as directed in Part 1 of this chapter before you prepare to palpate.
- Use a rectal sleeve (provided in lab) to cover your arm. Secure the top of the sleeve to your coveralls/lab coat/scrubs with a hemostat to help keep your arm covered as you palpate.
- When you begin, palpate without looking at the structure and then observe the structure through either the palpation access port (i.e., the hole in the abdominal wall) or the “diaphragmatic window.”
- Note that some structures will be described for observation only (i.e., they are out of reach).
- Try to keep/replace all viscera in their original position so that others can continue to palpate their normal placement after you have finished.
- You will start your palpation from one side, but before you leave that side you should also palpate the structures listed that can be palpated from either side (in the region of the pelvic inlet).
- Important Dissection Note: The development of the rumen within your calf specimen will be small due to the young age of the animal, so be sure to compare your findings with the large cow (dried) specimens available in the lab.
- Recall from Anatomy I that the abdominal cavity is formed by the muscles of the abdominal wall, the ribs, and the diaphragm. It is lined by peritoneum, which encloses the peritoneal cavity. The peritoneal cavity is a closed space lined by a serous membrane called peritoneum; this will include parietal and visceral layers (as well as connecting peritoneum extending between the two layers and forming mesentery).
-
As you proceed with this process, note the parietal peritoneum, which is the layer of serous membrane lining the body wall (and was incised to open the peritoneal cavity). Also note the visceral peritoneum, which is the layer surrounding/adhered to the surfaces of all of the organs within the abdominal cavity.
-
A third type of peritoneum is the connecting peritoneum that connects the parietal and visceral layers, or the visceral layers of adjacent organs. The connecting peritoneum forms peritoneal folds called ‘mesenteries’, ‘omenta’, or ‘ligaments’. We will identify various parts of connecting peritoneum as we progress through this dissection.
-
- Palpation and Visualization, LEFT SIDE: Palpate/visualize the spleen, and the dorsal, cranial, and ventral sacs of the rumen.
- On the LEFT side of the calf, (with the rectal sleeve on your right arm and referencing Figure 5-10) palpate the dorsal sac of the rumen, then reach cranially (forward) between the rumen and the body wall and attempt to locate the spleen dorsally, where it is fused to the rumen, close to the cardia.
- Ventral to the spleen, try to differentiate the cranial sac of the rumen from the more caudal ventral sac.
- Palpation and Visualization, LEFT SIDE: Incise the dorsal sac of the rumen, remove ingesta, and palpate the interior of the rumen; palpate the cranial pillar, ruminoreticular orifice, ruminoreticular fold, the reticulum and reticular cells (‘honeycomb’ lining) of the reticulum, reticular groove, caudal pillar of the rumen (with dorsal and ventral coronary pillars), and right and left longitudinal pillars.
-
- Make a vertical incision in the dorsal sac of the rumen. This incision should be about 3cm caudal to the last rib and no more than 8-12cm (4 inches) in length.
- Through this rumen incision remove as much ingesta as can be reached.
- After removal of the ingesta, palpate the interior of the rumen.
- Cranial to the incision in the dorsal sac, find the cranial pillar of the rumen.
- Cranial to the cranial pillar try to locate the ruminoreticular orifice and the ruminoreticular fold marking the entrance into the reticulum.
-
- Attempt to reach thru the ruminoreticular orifice into the reticulum to palpate the reticular groove and the cardia at the dorsal end of the groove.
-
- Palpate the reticulum. Note the characteristic reticular cells lining the reticulum. These cells are often referred to as the ‘honeycomb’ lining because they look similar in appearance to the honeycomb you see with honey bee colonies.
- Caudal to the rumen incision, find the caudal pillar of the rumen and note how on the right and left it merges with dorsal and ventral coronary pillars.
-
- Note that the caudal pillar extends across the rumen horizontally, while the coronary pillars extend vertically (dorsally and ventrally) from the caudal pillar.
-
- Attempt to find the right and left longitudinal pillars that separate the dorsal sac from the ventral sac.
- Before withdrawing your palpation hand, identify the structures listed that can be palpated from either side, unless you have already completed this palpation from the right side.
- Also, through the left diaphragmatic window, visually observe the spleen. It may also be possible to reach through the diaphragmatic window to palpate the exterior of the reticulum.
- Make a vertical incision in the dorsal sac of the rumen. This incision should be about 3cm caudal to the last rib and no more than 8-12cm (4 inches) in length.
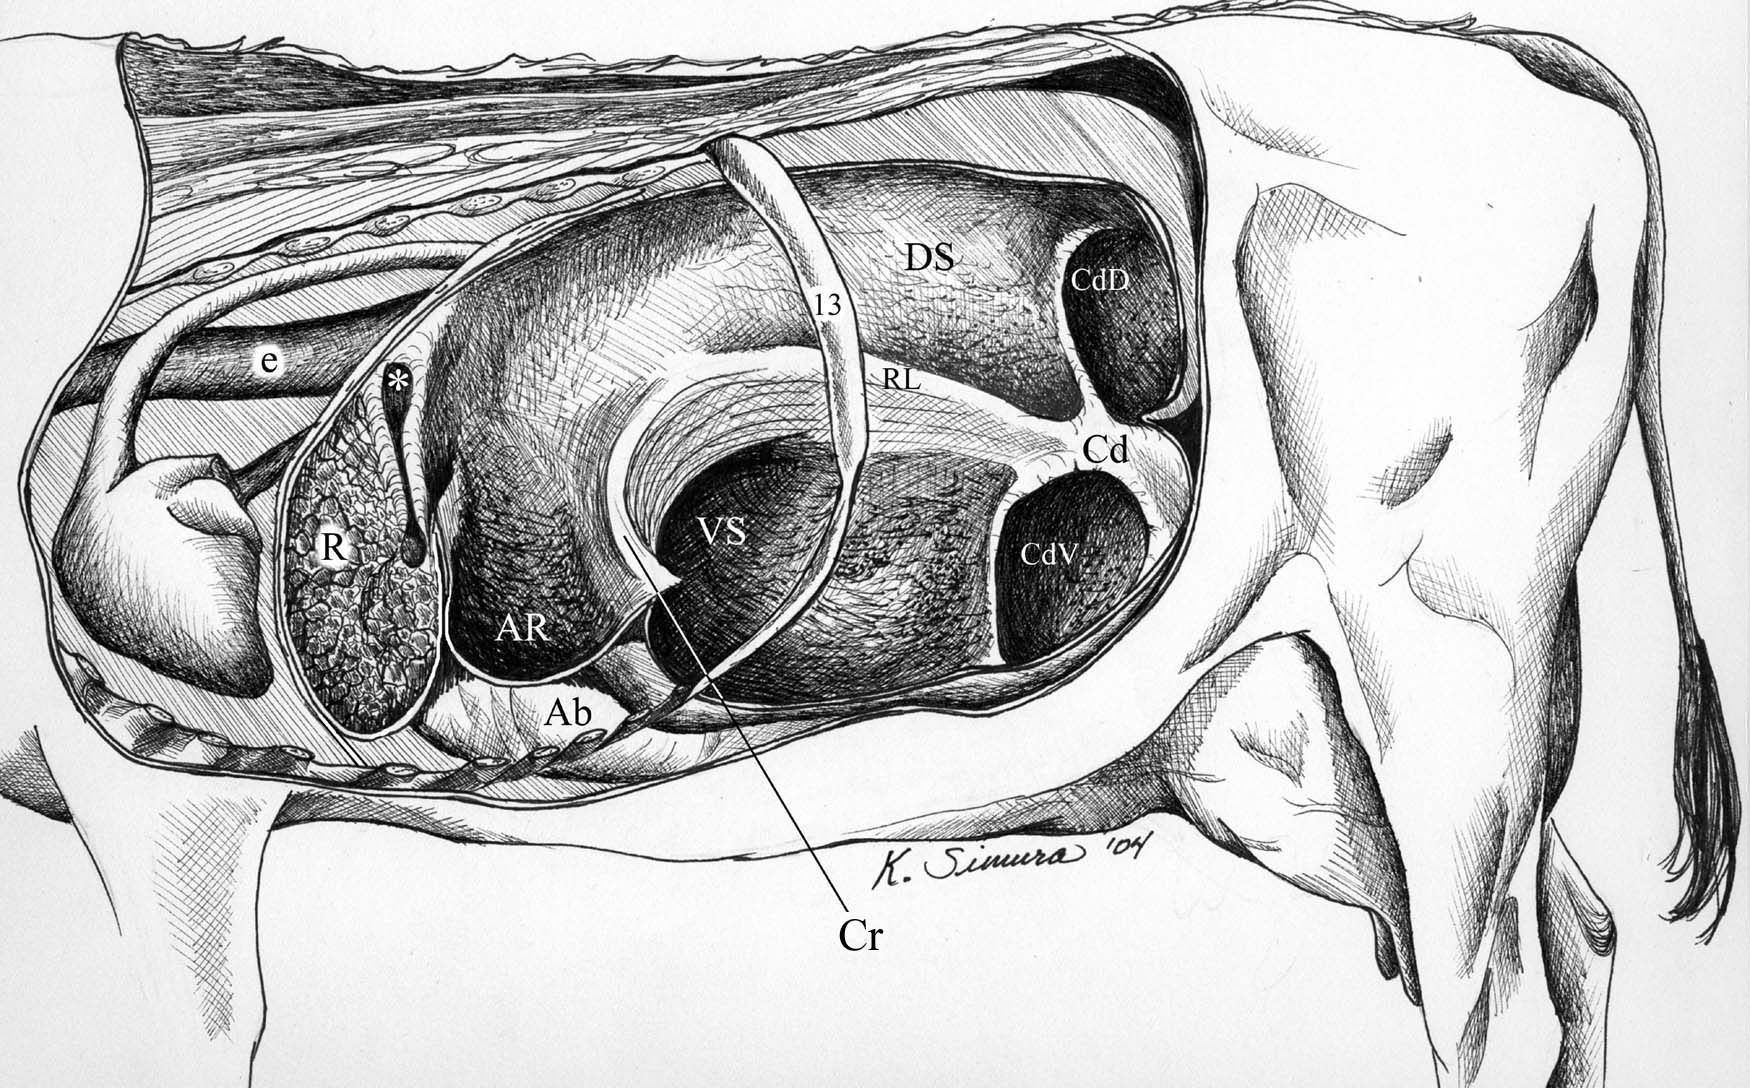
Figure 5-9. Bovine ruminoreticulum interior, viewed from the left side. Ab, abomasum; AR, cranial sac (atrium ruminis); Cd, caudal pillar; CdD, caudal dorsal blind sac; CdV, caudal ventral blind sac; Cr, cranial pillar; DS, dorsal sac; e, esophagus (cardia marked by *, reticular groove extends ventrally); R, reticulum; RL, right longitudinal pillar; VS, ventral sac. Not labeled is the ruminoreticular fold shown just caudal to the reticular groove. The dorsal and ventral coronary pillars separate DS from CdD and VS from Cdv, respectively.
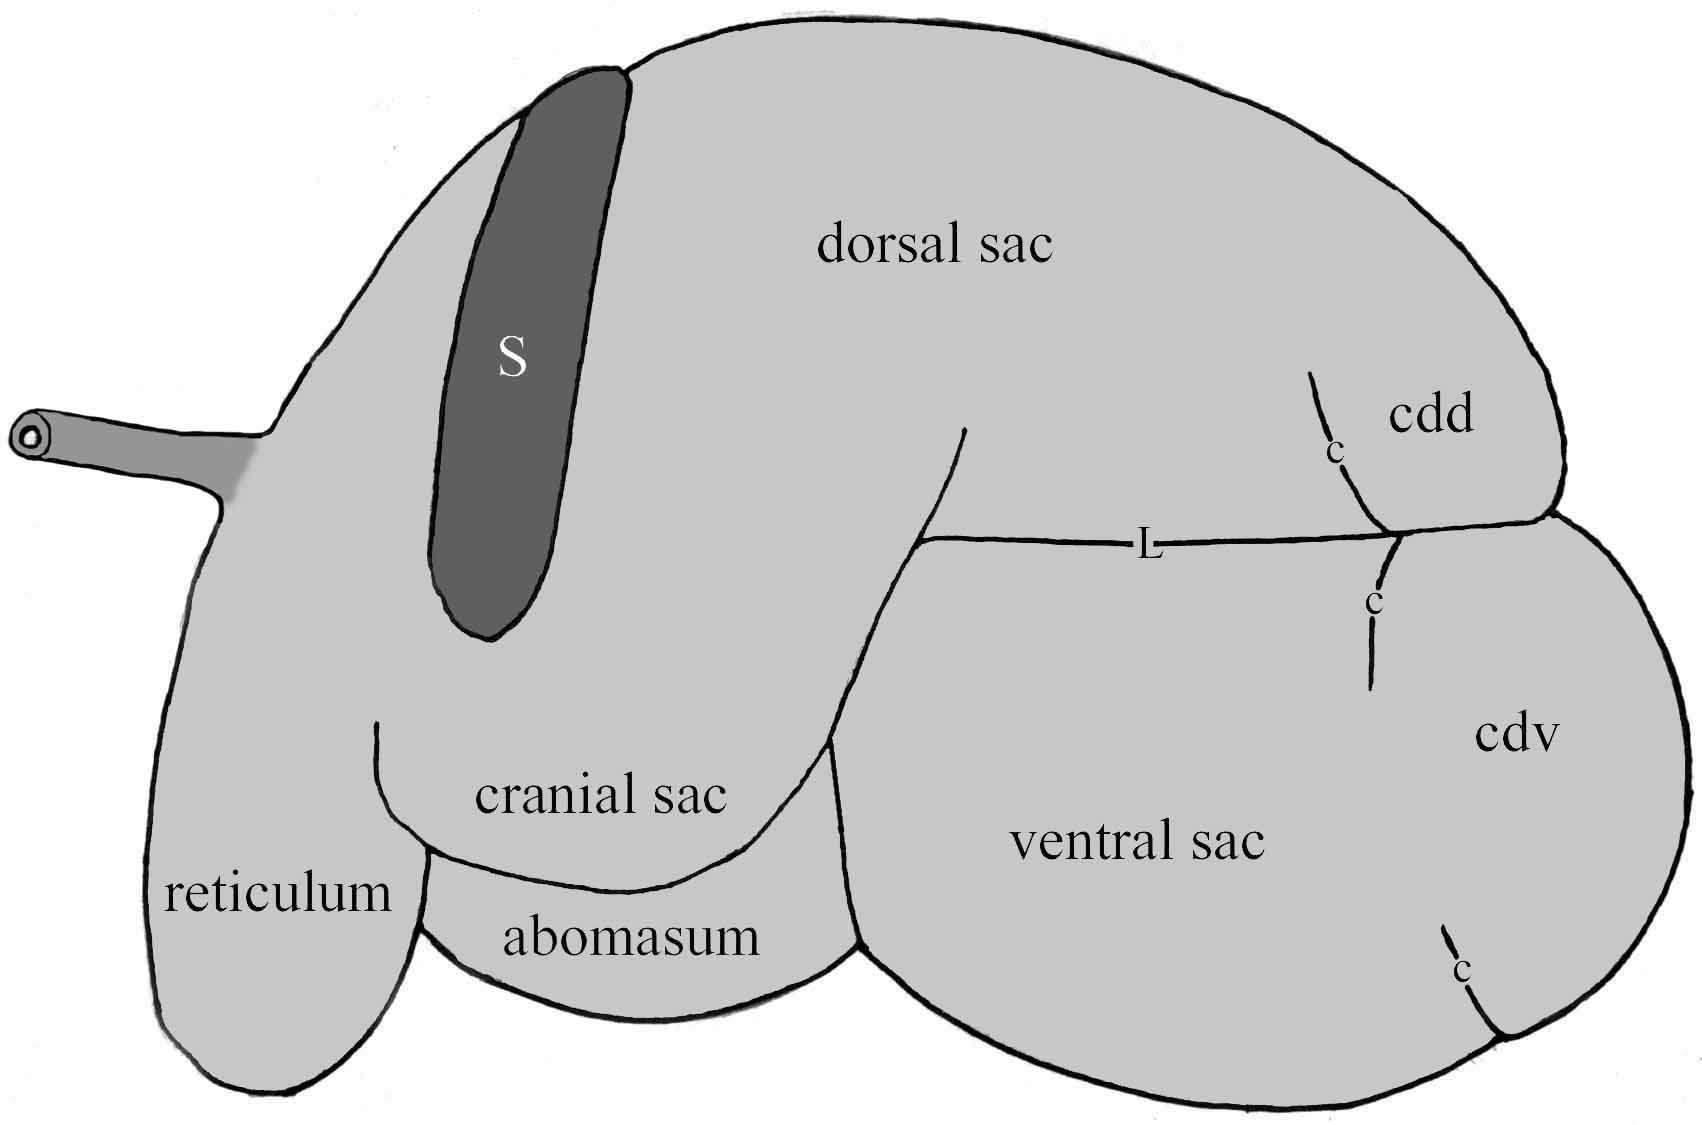
Figure 5-10. Bovine stomach, viewed from the left side. c, coronary groove (dorsal and ventral); cdd, caudal dorsal blind sac; cdv, caudal ventral blind sac; L, left longitudinal groove; S, spleen. The esophagus (not labeled) is shown darker due its striated muscle coat. (Also not shown is the superficial layer of omentum which attaches along the left longitudinal groove and covers the ventral sac, including the caudal ventral blind sac.)
9. Palpation and Visualization, RIGHT SIDE: Palpate/visualize the descending duodenum with attached mesoduodenum, superficial & deep layers of the greater omentum, omental bursa, abomasum, pylorus, lesser omentum, omasum, liver, gallbladder, kidneys, caudal fold of the omentum, and intestines.
-
- On the right side of the calf, (with the rectal sleeve on your left arm and referencing Figures 5-11 and 5-12) attempt to reach around the rumen caudally to get to the left side where you would commonly find a left displaced abomasum (LDA).
-
- This is important to attempt because the right flank is the most common site for displaced abomasum surgery; the LDA is found by reaching around the rumen caudally and gas is tapped out of it so that it can be pulled back to the right of the rumen.
-
- Palpate the descending duodenum and identify the mesoduodenum (connecting peritoneum) dorsal to it and the superficial layer of the greater omentum ventral to it.
- Reach cranially (forward) to locate the pylorus of the abomasum and attempt to palpate the lesser omentum which passes dorsally from the lesser curvature of the abomasum to the liver.
-
- Dissection Note: The position of the pylorus is variable but it will likely be ventral to the costal arch.
-
- Attempt to palpate the omasum which will feel like a hard, round ball deep to the lesser omentum.
- Move dorsally to palpate the liver; locate the gallbladder hanging down from the lateral edge of the liver.
- Move caudal to the liver and dorsal to the duodenum to palpate the kidneys (L & R).
- Find the caudal fold (free edge) of the omentum (Fig. 5-11/C) and pass your hand over it to palpate the intestines (within the supraomental recess/bursa).
- Grasp the superficial layer of the greater omentum with a forceps and attempt to pull it away from the deep layer so that a window can be cut in the superficial layer (Fig. 5-11) without cutting into the deep layer.
-
- This window should be about 5 cm in diameter and 5 cm ventral to the descending duodenum.
- After the window is cut each person should pass their fingers/hand into the omental bursa (space between the two layers of omentum) and palpate the intestines through the deep layer of the greater omentum.
-
- Ventrally you should feel jejunal loops and dorsally you may feel the coiled spiral colon.
-
-
- On the right side of the calf, (with the rectal sleeve on your left arm and referencing Figures 5-11 and 5-12) attempt to reach around the rumen caudally to get to the left side where you would commonly find a left displaced abomasum (LDA).
-
- Before withdrawing your palpation hand, identify the structures listed that can be palpated from either side, unless you have already completed this palpation from the right side.
- Also, through the right diaphragmatic window, visually observe the liver and gallbladder.
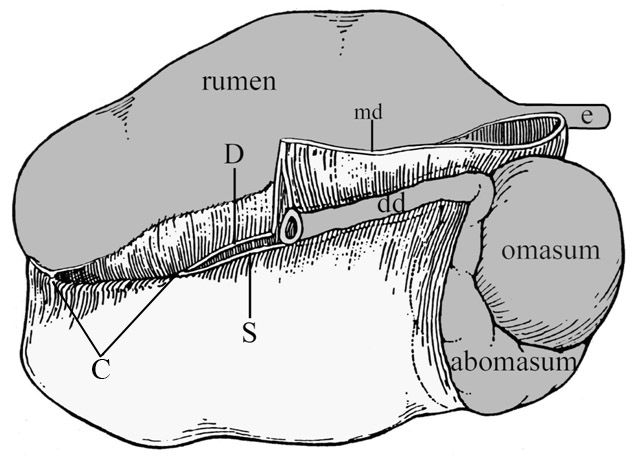
Figure 5-11. (Left) Bovine, schematic illustration of the omentum viewed from the right side. C, caudal fold of the omentum; D and S, deep and superficial layers of the greater omentum; dd, descending duodenum; e, esophagus; md, mesoduodenum. The lesser omentum is not shown but if present would cover the omasum and extend from the lesser curvature of the abomasum to the visceral surface of the liver.
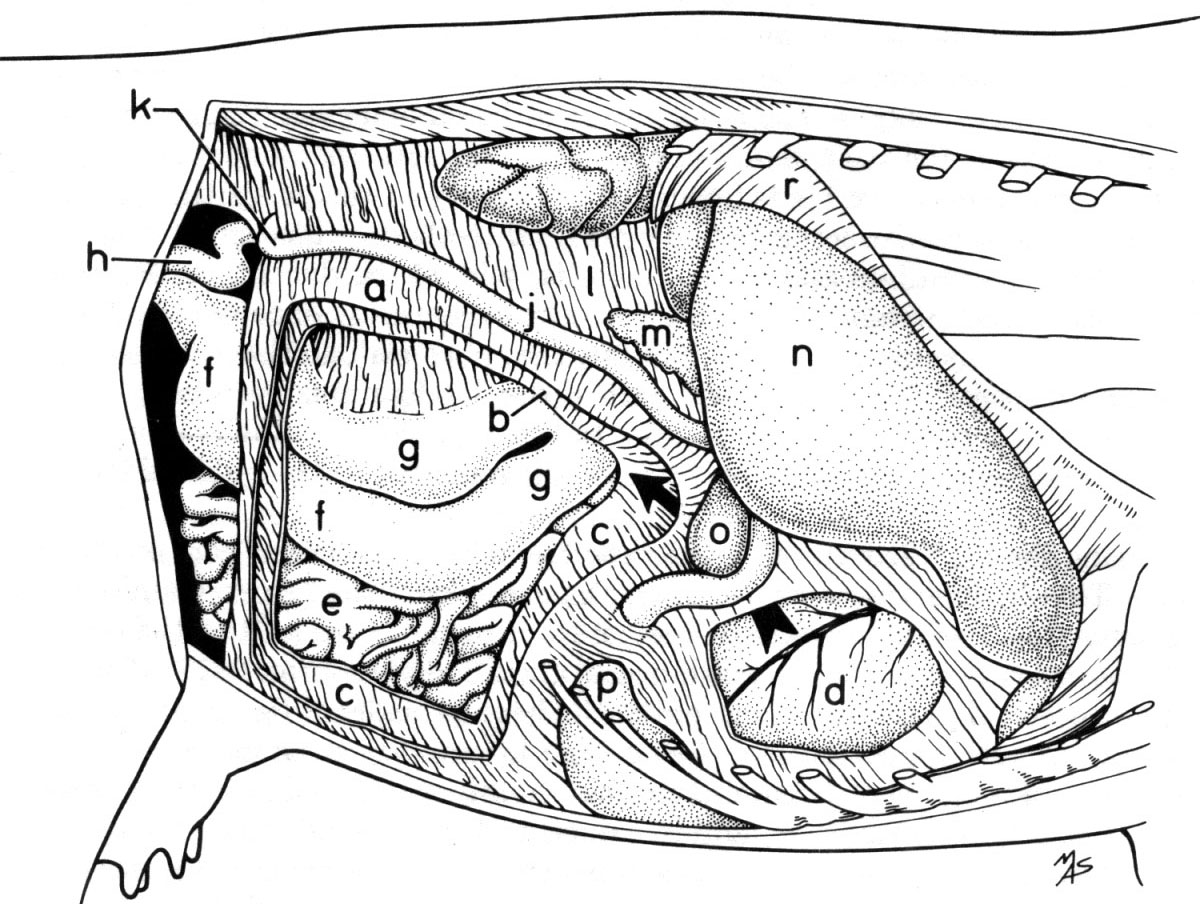
Figure 5-12. Bovine abdominal viscera, viewed from the right side. a, superficial layer of greater omentum; b, c deep layer of greater omentum; d, omasum (viewed through a window cut in the lesser omentum); e, small intestines; f, g, ascending colon; h, descending colon; j, descending duodenum; k, caudal flexure of the duodenum; l, mesodudodenum; m, pancreas; n, liver; o, gall bladder; p, pylorus; r, diaphragm.
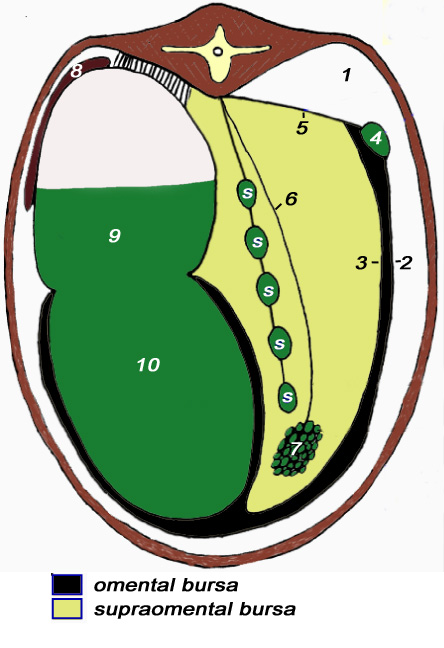
Figure 5-13. (Left) Bovine, schematic illustration of cross section of bovine abdomen at the level of L2. 1, peritoneal cavity; 2, 3; superficial and deep layers of greater omentum; 4, duodenum; 5, mesoduodenum; 6, mesojejunum; 7, jejunum; 8, spleen; 9, 10, dorsal and ventral sacs of rumen. Note:Spleen is not connected to the greater omentum as it is in other domestic animals.
10. Palpation and Visualization, EITHER SIDE: Palpate/visualize the pelvic brim, urinary bladder, uterus/ovaries (heifer, cow), ductus deferens and vaginal ring with vessels to the testes (steer, bull), and descending colon (aka small colon) entering the pelvic inlet.
-
- From either side, reach caudally to palpate the region of the pelvic inlet and feel the pelvic brim (cranial edge of the pelvis/pubic region).
- Trace the descending colon (aka small colon) into the pelvic inlet where it becomes the rectum.
- Palpate the urinary bladder.
- ALL FEMALE calves/bovines (heifers, cows): Attempt to find the uterus and ovary (ovaries, L and R). (Note that, due to the young age of these calves, the reproductive organs will be small and underdeveloped and may be difficult to find/identify.)
-
- Ventral to the uterine body palpate the urinary bladder.
- Note that the descending (small) colon is dorsal to the uterus as it passes into the pelvic inlet where it becomes the rectum.
-
- ALL MALE calves/bovines (bulls, steers): Attempt to find the ductus deferens and vaginal ring. (Recall that the vaginal ring is the reflection of the parietal peritoneum through the deep inguinal ring that surrounds the origin of the spermatic cord.)
-
- Attempt to locate the vessels of the testis on the craniolateral edge of the vaginal ring.
-
STEP 2, The “Reveal”: Do this after ALL group members have palpated!
- ALL (CALF) specimens: Follow the directions outlined below to exteriorize the abdominal contents and visualize the dorsal attachment points:
-
- Position a table underneath the belly of the calf specimen to “catch” the viscera.
- On both sides of the calf, make vertical incisions through the abdominal wall at the level of the last rib; connect these incisions ventrally.
- ALL MALE specimens: At this point it is critical that no damage is done to the prepuce or penis as the vertical incisions are extended to the midline; be sure your connecting incision is cranial to the penis/prepuce.
- ALL FEMALE specimens: Avoid damage to the udder when connecting your incisions ventrally.
- If needed, make a ventral midline cut cranially toward the costal arch.
- Allow the viscera to drop down (onto/toward the table), but leave the dorsal visceral attachments intact. Take note of these attachments, and observe how the digestive tract is connected to the dorsal body wall.
removal of CALF abdominal viscera
On selected calves (see posting in lab), remove the abdominal viscera from the specimen by following the steps outlined below. The following procedure will allow you to remove the abdominal viscera and attached major vessels en masse. Make sure that all members of your group have seen the attachment points of the viscera to the body before proceeding with this step.
- To remove the abdominal viscera en masse, sever the aorta at two points: (1) cranial to the aortic hiatus of the diaphragm and (2) cranial to the terminal bifurcation of the aorta (before the branching to the hind limbs). This will allow for the removal of the entire abdominal aorta along with the viscera.
- Sever the caudal vena cava at the same levels as the aorta.
- Cut the esophagus cranial to the esophageal hiatus of the diaphragm.
- Complete the transection of the edges of the diaphragm, cutting the costal, sternal and lumbar parts and pulling it away from the ribcage (the diaphragm will go with the viscera).
- Tie off the descending (small) colon near the pelvic inlet with two ligatures (strings) about 5 cm apart. Cut between these ligatures to protect the visceral mass from fecal contamination.
- Free the viscera from any dorsal fascial attachments and remove the abdominal viscera as a complete unit – this will include the liver, diaphragm, the abdominal aorta/caudal vena cava and both kidneys.
- As you free the viscera, the ureters will be exposed and should be cut midway between the kidneys and the neck of the urinary bladder. The urinary bladder should stay within the body, associated with the pelvis.
- Due to the weight of the viscera, removal from the abdominal cavity will involve allowing the visceral mass to descend to the table gradually.
isolated BOVINE/ruminant abdominal viscera
Use the following descriptions to help you study and identify structures of the bovine/ruminant abdominal viscera. Be sure to look at all available isolated specimens, which could include both embalmed and fresh bovine/ruminant gastrointestinal (GI) tracts as well as dried specimens.
spleen
- Identify the large spleen on the left side of the visceral mass where it is attached to the rumen and note its elongated shape. (Figure 5-10)
kidneys (Left and right)
2. While the kidneys of small ruminants have a smooth surface and structure similar to that of the dog, bovine kidneys have ten or more rather distinct lobes (Fig. 5-14 and TVA 696-697).
-
- Each lobe can be seen on section to have a separate renal cortex and renal medulla.
3. At the hilus of each kidney, identify the ureter and look for the renal artery and vein.
-
- Recall from Anatomy I that the hilus is the indentation in the kidney where renal vessels and nerves, as well as the ureter, communicate with the kidney.
- Note the branching of the ureter to form cranial and caudal principal branches and then secondary branches to each lobe.
4. Section two adjacent lobes of the bovine kidney along the greater (outer) curvature and identify the renal cortex, renal medulla and calyx associated with each lobe.
-
- The calyx (cup) is the place where urine is collected from the medullary papilla and passed on to the ureter since the bovine lacks a renal pelvis.
5. In life (in situ), the left kidney of ruminants is pushed to the right side by the expansive rumen so that it hangs down medial to the dorsal sac of the rumen (TVA 703, right, 8, 10). Therefore, the left kidney is intraperitoneal rather than retroperitoneal as kidneys usually are.
-
- Clinical Note: In cattle, the left kidney can be palpated per rectum because it is more caudal than the right.
6. In addition to the fresh viscera and preserved kidney specimens, you should also observe the latex cast specimen of the bovine kidneys and the dried specimens that are available.
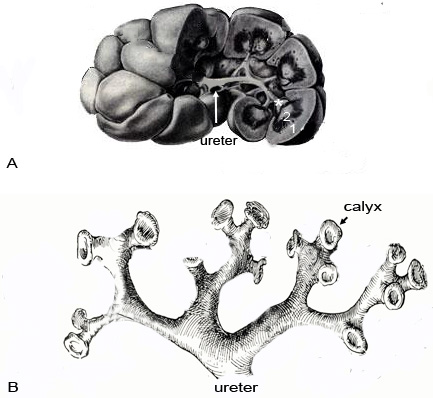
Figure 5-14. (Left) Schematic of bovine kidney. A Kidney cut to reveal interior; 1, renal cortex; 2, renal medulla; *, calyx. B,Extrarenal urine collection. Calyxes collect urine from each lobe, ureter carries urine to bladder. One calyx identified.
liver
7. The ruminant liver consists of four poorly differentiated lobes: left, quadrate, right and caudate lobes. The parietal side of the liver is the dorsal side and it lays against the diaphragm; on this side note the notch that marks the separation between the left and right lobes of the liver.
-
- Note that the right and left liver lobes are poorly differentiated in ruminants, probably because the liver is pushed entirely to the right side by the greatly enlarged stomach (TVA 683, right side, 9).
- The quadrate lobe is small and somewhat indistinct, so you need not identify it.
- Note that the caudate lobe of the liver is clearly differentiated from the right lobe.
- Dissection Note: Sometimes, a round ligament of the liver can be found between the left lobe and the quadrate lobe. This can be a helpful landmark when identifying the liver lobes. In situ, the round ligament of the liver courses in the free border of the falciform ligament.
8. At the level of the diaphragm, open the caudal vena cava with a longitudinal incision and find the openings of the hepatic veins (draining into the caudal vena cava).
9. Elevate the liver, noting the lesser omentum which extends from the lesser curvature of the abomasum to the visceral side of the liver (and covers the omasum). On the visceral side of the liver, attempt to find the epiploic foramen (between the caudate liver lobe and the duodenum) and verify that the caudal vena cava is dorsal to it.
-
- Identify the caudal vena cava and portal vein.
10. Also on the visceral surface of the liver, identify the gallbladder between the quadrate and right lobes of the liver. Find the cystic duct which enters the neck of the gallbladder and is continuous distally with the bile duct.
-
- Look for hepatic ducts from the liver lobes as they join the bile duct.
- Trace the bile duct to the duodenum and open the duodenum longitudinally to find the orifice of the bile duct.
- Species Comparative Note: The gallbladder is absent in ruminants with antlers (cervids) but present in horned ruminants (bovids). It is also absent in horse, camelids, giraffe and rat (but not mouse). The reason for these species differences is mysterious since there is no apparent correlation with diet. The gallbladder stores bile for fat emulsification and is present in all carnivores where the diet has a higher fat content.
pancreas
Note that all species, including bovine/ruminant, have a pancreas. However, the pancreas is difficult to see/find grossly on many of the specimens, so you are not required to identify it.
stomach
11. Externally, identify the esophagus and trace it to where it enters the stomach.
-
- On the wet specimens, compare the dark color of the esophagus with the lighter color of the rumen wall. The dark color of the esophagus is due to striated muscle which extends as far as the stomach in ruminants, pigs, and dogs but not in cats, horses, and humans.
12. Recall that the spleen marks the left side of the stomach and is fused to the dorsal part of the left rumen wall near the cardia.
-
- Comparative Note: As you will note, in ruminants the spleen is not attached to the greater omentum as it is in other species.
13. DRY specimens: Looking externally at a dried (inflated) stomach, identify these four compartments: rumen, reticulum, omasum and abomasum.
-
- On the rumen, identify the dorsal, ventral, and cranial sacs. Then identify the dorsal and ventral caudal blind sacs. (Figs. 5-10 and 5-15)
- The dorsal and ventral sacs of the rumen are separated by longitudinal grooves. Externally, identify the right and left longitudinal grooves running between the dorsal and ventral sacs of the rumen, on the right and left sides respectively.
-
- Internally, identify the right and left longitudinal pillars associated with the externally viewed right and left longitudinal grooves.
-
- Helpful Hint: Grooves are outside (external) while pillars are inside (internal).
-
- Note that in situ/in life, the superficial layer of the greater omentum attaches to the left longitudinal groove, and the deep layer of the greater omentum attaches to the right longitudinal groove.
- Internally, identify the right and left longitudinal pillars associated with the externally viewed right and left longitudinal grooves.
-
14. DRY specimens: While still looking at the dried stomach, internally, identify the cranial and caudal pillars that are between the dorsal and ventral sacs, crossing the rumen horizontally (spanning across the interior of the stomach).
-
- Identify the dorsal and ventral coronary pillars arising vertically from the caudal pillar.
-
- Note that caudal to the coronary pillars are the respective dorsal and ventral caudal blind sacs (previously identified).
-
- Cranial to the cranial pillar, note the cranial sac and the ruminoreticular fold which marks the cranial extent of the cranial sac, and is the boundary found between the rumen and reticulum. Ingesta passes back and forth between the rumen and reticulum over this fold, through the ruminoreticular orifice.
- Note that the inside of the rumen has a variable covering of rumen papillae.
-
- Dissection Note: The rumen papillae will be more easily observed in the fixed and fresh specimens than on the dried specimens.
-
- Identify the dorsal and ventral coronary pillars arising vertically from the caudal pillar.
15. DRY specimens: Cranial to the ruminoreticular fold note the distinctive “honeycomb” lining of the reticulum, composed of reticular cells.
-
- Note the reticular groove running from the cardia (where the esophagus ends/enters the stomach), along the medial wall of the reticulum to the opening into the omasum.
-
- Clinical Notes: When suckling calves take in milk, the ridges on the sides of the reticular groove come together to form a tube to shunt the milk into the omasum and abomasum, bypassing the rumen and reticulum. Clinically, the reticular groove may be used to bypass rumen digestion and deliver medications in younger animals and some older cattle.
-
- At the bottom of the reticular groove, identify the reticulo-omasal orifice (the opening going from the reticulum into the omasum).
- Note that you may also observe the reticular cells of the reticulum and the reticular groove on freeze dried sections of a bovine stomach from the museum collection.
- Note the reticular groove running from the cardia (where the esophagus ends/enters the stomach), along the medial wall of the reticulum to the opening into the omasum.
16. DRY specimens: Identify the omasum and observe the parallel omasal laminae within it.
-
- Note that you may also observe the omasal laminae on a freeze dried section of a bovine omasum from the museum collection.
17. DRY specimens: Ventral/distal to the omasum find the spindle shaped abomasum.
-
- Note that in the pyloric region of the abomasum, there is a torus pyloricus in the bovine (not clearly visible on the dried specimens). The structure is similar to what was seen in the pig pyloric region, but is usually less defined/distinctive.
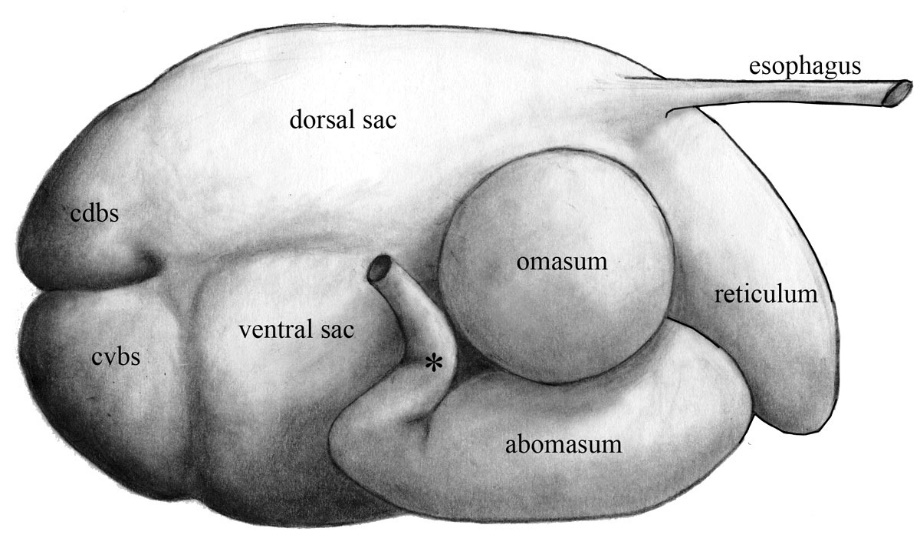
Figure 5-15. (Left) Bovine stomach, viewed from the right side. Cdbs, caudal dorsal blind sac, cvbs, caudal ventral blind sac *, location of the pylorus.
18. WET specimens: Find the dorsal sac of the rumen and incise its dorsal wall so that about two thirds of the dorsal sac is included in the incision.
-
- Empty the rumen of all ingesta and wash it out so the inside can be easily viewed.
19. WET specimens: Externally, look at the greater omentum and identify its parts.
-
- In the ruminant, the greater omentum is composed of two layers: (1) a superficial layer and (2) a deep layer which attach to the longitudinal grooves of the rumen; between these two layers of the greater omentum is the omental bursa. (Fig. 5-13)
-
- Note that the superficial layer of the greater omentum attaches to the left longitudinal groove, and the deep layer of the greater omentum attaches to the right longitudinal groove.
- Both layers of greater omentum extend from an attachment on the greater curvature of the abomasum and descending duodenum and, caudally, the two layers combine to form the caudal fold of the omentum (Fig. 5-11).
-
- Dissection Note: Quite often the greater omentum is torn and heavily laden with fat in the embalmed specimens; however, if it is intact then the intestines will be enclosed by it, resting in a region called the supraomental recess (aka supraomental bursa) (see Figure 5-13).
- In the ruminant, the greater omentum is composed of two layers: (1) a superficial layer and (2) a deep layer which attach to the longitudinal grooves of the rumen; between these two layers of the greater omentum is the omental bursa. (Fig. 5-13)
20. WET specimens: Inside the rumen note the rumen papillae. Identify the dorsal, ventral and cranial sacs of the rumen. Then, identify the dorsal and ventral caudal blind sacs. (Figs. 5-10 and 5-15)
-
- When looking inside the rumen, note where the rumen papillae are well-developed, and also where they are less developed and not as densely packed.
- Identify the cranial and caudal pillars that are between the dorsal and ventral sacs, crossing the rumen horizontally (spanning across the interior of the stomach).
-
- Identify the dorsal and ventral coronary pillars arising vertically from the caudal pillar.
-
- Note that caudal to the coronary pillars are the respective dorsal and ventral caudal blind sacs (previously identified).
-
- Identify the dorsal and ventral coronary pillars arising vertically from the caudal pillar.
-
- Cranial to the cranial pillar, note the cranial sac and the ruminoreticular fold which marks the cranial extent of the cranial sac, and is the boundary found between the rumen and reticulum. Ingesta passes back and forth between the rumen and reticulum over this fold, through the ruminoreticular orifice.
21. WET specimens: Identify the reticulum and make a vertical incision through its wall on the left lateral side.
-
- Remove the ingesta from the reticulum and note the mucosal reticular cells (‘honeycomb’) lining its walls and find the reticular groove.
-
- At the top of the reticular groove, identify the cardia (where the esophagus enters the stomach).
- At the bottom of the reticular groove, identify the reticulo-omasal orifice, leading from the reticulum into the omasum.
-
- Clinical Notes: When suckling calves take in milk, the ridges on the sides of the reticular groove come together to form a tube to shunt the milk into the omasum and abomasum, bypassing the rumen and reticulum. Clinically, the reticular groove may be used to bypass rumen digestion and deliver medications in younger animals and some older cattle.
-
-
- Remove the ingesta from the reticulum and note the mucosal reticular cells (‘honeycomb’) lining its walls and find the reticular groove.
22. WET specimens: Identify the round, ball-shaped omasum lying deep to the lesser omentum.
-
- Dissection Note: You may cut through the lesser omentum to view the omasum, however, preserve this tissue for study with the abomasum.
- Make an incision through the wall of the omasum on its right lateral side and remove the ingesta; note its composition relative to other compartments. Is it drier or more fluid than the rumen ingesta? (It is drier.)
- Examine the omasal laminae within the omasum and the low conical papillae that cover them (TVA 690, top left).
- Comparative Note: In small ruminants (sheep and goats) the omasum will be smaller (relative to the rumen) than is the case in cattle.
23. WET specimens: Identify the abomasum with the attached greater omentum attaching to its greater curvature and then identify the cut ends of the lesser omentum attaching to its lesser curvature.
-
- Note that there are 2 layers of the greater omentum but only one layer of the lesser omentum (TVA 681/c/13) and the lesser omentum extends to the visceral surface of the liver.
- Make a longitudinal incision through the wall of the abomasum over the middle two thirds of the greater curvature.
- Observe the lining of the abomasum and look for low longitudinally oriented folds of its lining.
- Palpate the terminal part of the abomasum and try to locate the thickened area of the pylorus.
-
- Make a longitudinal incision through the wall of the abomasum in the pylorus and observe the pyloric sphincter and the torus pyloricus, a rounded tubercle that acts like a valve in the lumen of the pyloric sphincter (this structure is similar in appearance to the porcine torus pyloricus).
-
small intestine
24. WET specimens: Starting from the pylorus of the abomasum, identify the descending duodenum and follow it to the caudal flexure of the duodenum.
-
- Note the mesoduodenum (connecting mesentery) along the length of the duodenum.
- Move on to the short ascending duodenum which leads to the very long and convoluted jejunum.
25. WET specimens: Identify the jejunum and note there are multiple jejunal loops.
-
- Look for numerous oblong mesenteric lymph nodes in the mesojejunum (TVA 694).
26. WET specimens: Follow the jejunum into the straightened ileum which terminates in the colon adjacent to the cecum.
-
- Identify the ileocecal fold between the cecum and the ileum (the fold of mesentery found between/connecting the ileum and cecum).
- Note the small diameter of the ileum as compared to the cecum and colon.
- Find the ileal (ileocolic) orifice, which is not remarkable in ruminants, but is significant in the pig.
-
- Make a longitudinal incision through the dorsal wall of the cecum and the initial part of the colon and wash out the contents to see this orifice.
-
large intestine
27. Just as in the horse, the ruminant ascending colon is greatly expanded, but in this case it takes the form of a flattened spiral. In the isolated embalmed and/or fresh specimens (wet specimens), starting at the cecocolic junction, find the beginning of the ascending colon, the proximal loop of the ascending colon, and trace it to the spiral colon.
-
- Within the spiral colon, differentiate the centripetal coils, which coil toward the center, from the centrifugal coils, which coil away from the center (i.e., centrifugal coils ‘flee’ from the center of the spiral).
-
- Identify the central flexure where the direction of the coils changes from inward (centripetal) to outward (centrifugal) spirals.
-
- As the centrifugal coils make their way out of the tight spiral, find the small diameter distal loop of the ascending colon and note how it is hidden by the larger diameter proximal loop (Fig. 11-4 and TVA 694).
- Dissection Note: Note that the spiral colon is plainly seen on the (inner) medial side of the greater omentum but obscured by the mesojejunum from a lateral view of the abdominal cavity.
- Trace the distal loop of the ascending colon to the short transverse colon and then to the descending colon (aka small colon). (The descending (small) colon then terminates as the rectum.)
- Within the spiral colon, differentiate the centripetal coils, which coil toward the center, from the centrifugal coils, which coil away from the center (i.e., centrifugal coils ‘flee’ from the center of the spiral).
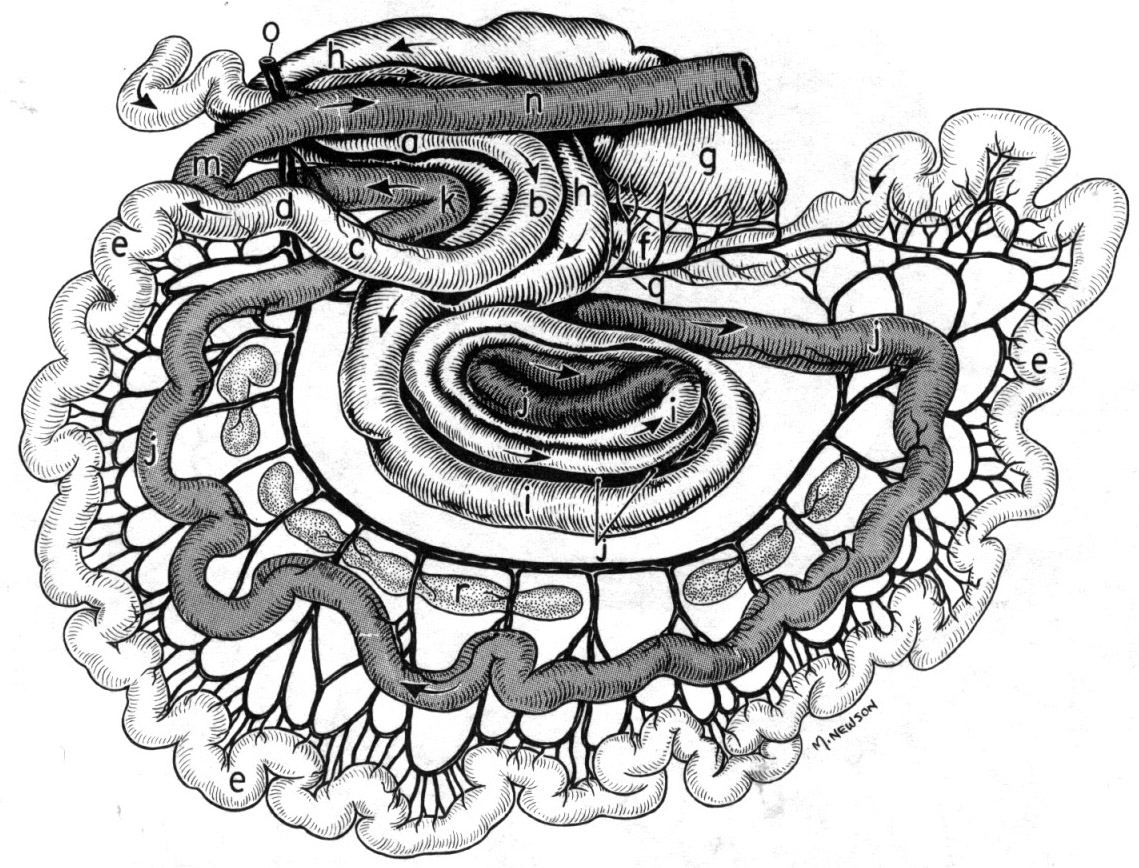
Figure 5-16. (Left) Sheep intestines, viewed from the left side. a-d, duodenum; e, jejunum; f, ileum; g, cecum; h, proximal loop of ascending colon; i, centripetal loop of spiral colon; j, centrifugal loop of spiral colon; k-n, distal loop of ascending colon; o, cranial mesenteric artery.
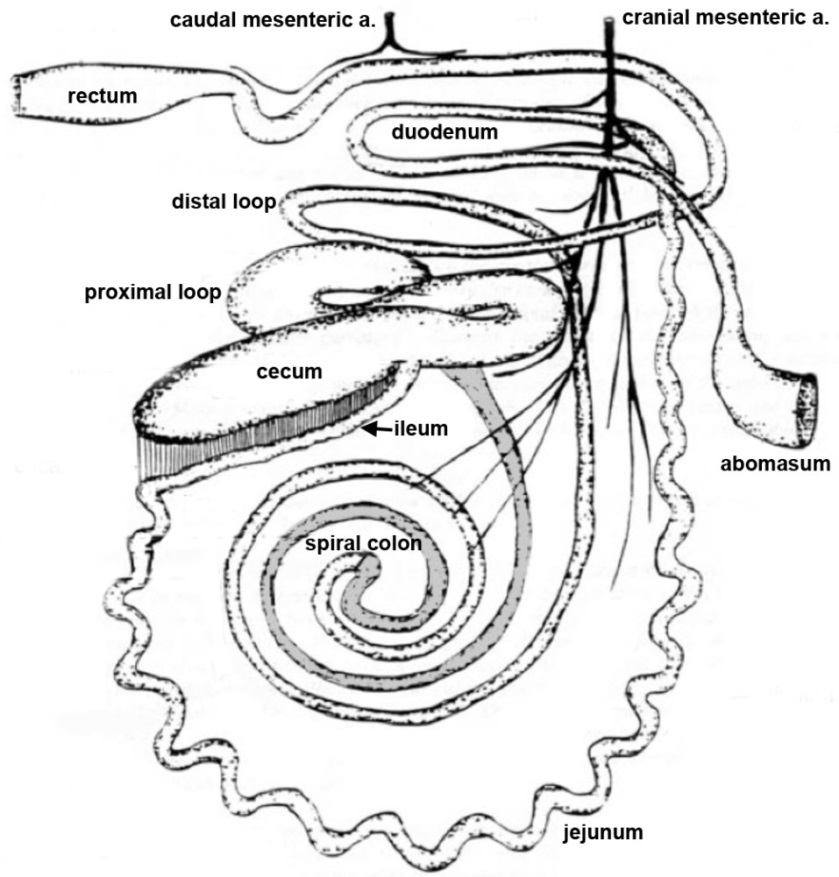
Figure 5-17. (Left) Bovine intestines, viewed from the right side.
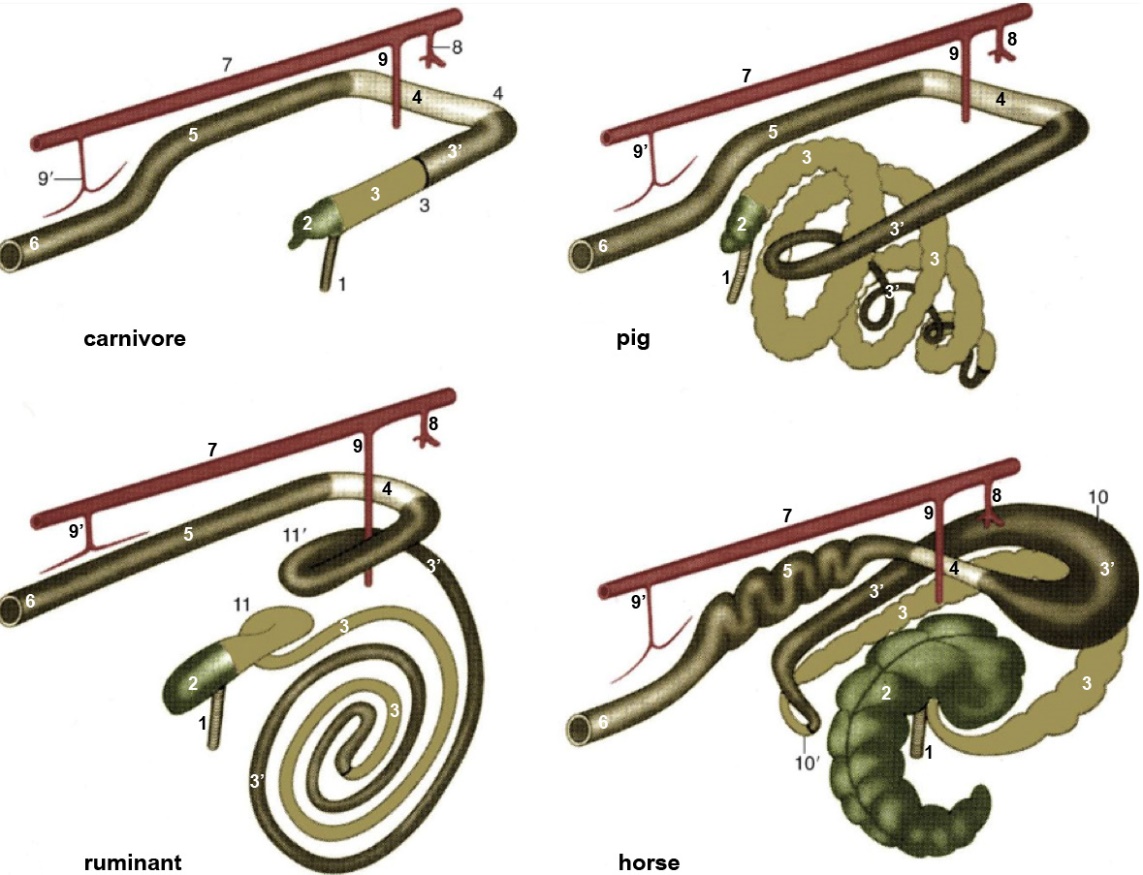 Figure 5-18. Schematic drawing of the large intestine of the domestic mammals. The cranial aspect is to the upper right of each image. 1, ileum; 2, cecum; 3, 3’ ascending colon; 4, transverse colon; 5, descending colon; 6, rectum and anus; 7, aorta; 8, celiac artery; 9, 9’, cranial and caudal mesenteric arteries; 10, 10’, dorsal diaphragmatic and pelvic flexures of ascending colon; 11, 11’, proximal and distal loops of ascending colon. (TVA Fig. 3-45)
Major abdominal arteries
28. The arterial branching pattern off of the abdominal aorta in the bovine/ruminant is very similar to the carnivore. As was seen in the dog (and horse), the main branches from the abdominal aorta that supply the majority of GI viscera are the celiac a. (with the splenic, left gastric and hepatic branches) and the cranial mesenteric a.
-
- On an isolated (removed) GI tract, using blunt dissection look for the origins of the celiac a. and the cranial mesenteric a. branching from the abdominal aorta to supply the abdominal viscera.
-
-
The unpaired celiac artery will be the first major branch of the abdominal aorta just caudal to the aortic hiatus; attempt to identify the celiac artery branching from the abdominal aorta.
-
-
Dissection Note: The celiac artery will divide into 3 primary branches: splenic, hepatic and left gastric, but we will not dissect/identify them.
- Comparative Note: Note that there will be additional branches from these arteries to supply blood to the ruminoreticulum which were not seen in the other species.
-
-
-
The second major branch to identify (arising from the abdominal aorta) is the cranial mesenteric a. This unpaired vessel arises just caudal to the celiac artery. It courses ventrally into the root of the mesentery and divides into numerous branches. (Fig. 5-17)
- Generally speaking, the celiac artery is the main blood supply to the stomach (and other accessory GI organs) and the cranial mesenteric artery is the main blood supply to the intestines.
-
-
- On an isolated (removed) GI tract, using blunt dissection look for the origins of the celiac a. and the cranial mesenteric a. branching from the abdominal aorta to supply the abdominal viscera.
Dissection Videos for this Section of Material
Bovine (Calf) Abdomen
- In situ Abdomen, Left and Right sides: https://youtu.be/IvQkIFzW-Rc
- Embalmed (Isolated) Abdominal Viscera: https://youtu.be/NMXD-UhgCYI?list=PLyFIwFMeNNrKnI8h9iHO70nV6QJ2KT60T
- Fresh (Isolated) Abdominal Viscera: https://youtu.be/8NIYradWf8A?list=PLyFIwFMeNNrKnI8h9iHO70nV6QJ2KT60T
Isolated Museum specimens
- Bovine:
- Dried Stomach: https://youtu.be/TtfjtZgo7S4