
Module 6: Blood Smear Technique and Reticulocyte Counting
Module 6.2: Blood Smear Procedure
Criteria to determine acceptability:
How do I know if I am reviewing a diagnostic slide?
Acceptability Criteria
- The smear is smooth, with no ripples due to the jerky movement.
- Holes do not appear in the blood smear.
- Extends at least 2/3’s of the slide.
- The smear is spread across (side to side) both sides of the slide to the edge.
- Rainbow sheen at the end of the slide. (feathered edge and monolayer)
- Smear begins 0.5 inches from the base of the slide or 4mm from the frosted edge
- The slide is labeled with the patient identifier and type of sample (in this case, “blood film”)
It is important to note that this technique is optimized for a healthy patient. If an animal is anemic, then you will need to increase your angle to ensure the appropriate spreading of the blood. Conversely, if the animal is hemoconcentrated (most commonly from dehydration), you will need to decrease your angle.
Another important thing to remember is that the erythrocytes and white blood cells are in suspension in your EDTA tube. This means that as your tube sits on your benchtop, the WBC and RBCs begin to settle to the bottom of the EDTA tube. It is imperative that you gently rock the tube back and forth to re-suspended the RBCs and WBC’s.
What happens if you do not re-suspend your blood sample and allow the cells to settle?
- May artifactually make your patient appear anemic
- Heavy cells, such as neoplastic cells, will settle to the bottom and may not end up on the smear
- May artifactually make your patient look leukopenic
- Will skew your WBC differential as WBC settles to the bottom at a different rate.
This same settling phenomenon occurs on the drop of blood you place on your glass slide as well! So be sure not to let your drop sit for more than a few seconds without spreading your sample. Once you place the drop of blood on the slide, be sure to be ready to spread the blood to avoid settling of cells on your slide.
Knowledge check
How to make a blood smear
In the laboratory, we will not be practicing the blood smear technique, as this is a task typically performed by veterinary paraprofessionals. It is outlined here for your reference in the future.
Supplies needed for preparing a blood smear:
-
- 2 glass slides
- Immersion oil
- Blood sample
- Microscope
Steps
1. On one slide (the sample slide) place a small drop of well-mixed blood. If the blood is not well mixed the WBCs will settle to the bottom of the EDTA tube or syringe.
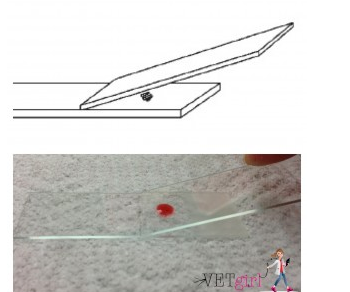
2. Use the second slide as a spreader slide
3. Place the end of the spreader slide on the sample slide so that the short-sided edge of the spreader is below the drop of blood
4. Hold the spreader slide at an angle of 30-45o (relative to the sample slide) and bring the spreader slide back against the drop of blood so that the blood spreads in a thin line via capillary action
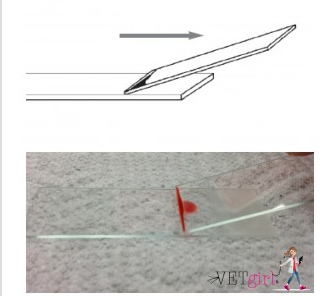
5. Rapidly-but gently –drag the spreader slide along the entire length of the sample slide in one fluid motion
6. If the technique was performed correctly, the smear should end before the end of the sample slide in a “feathered edge”
7. Air-dry the sample slide (NEVER HEAT FIX). Fix and stain (Diff Quik) the slide
Knowledge check
Key Takeaways for Blood Smears
- The feathered edge is where large cells and large organisms migrate to (i.e. neoplastic cells, microfilaria)
- The monolayer is the zone in which there is an equal distribution of erythrocytes (RBC) and leukocytes (WBC) and lies between the body and the feathered edge.
- An acceptable blood smear from a healthy animal will have all 3 zones.
- The monolayer is where we perform 100 WBC count, platelet counts, and evaluate erythrocyte morphology
- Depending on the PCV/HCT, the angle at which you hold the slider may need to be increased or decreased
- Always mix your blood before preparing a blood smear
